Build Your Own High-Efficiency Filament Dryer
Introduction
If you're a 3D printing enthusiast, you know that moisture in filament can ruin your prints. Filament dryers are essential, but commercial options can be expensive or lack effective drying. A few years ago, maker Saša Karanović shared a DIY filament dryer that improved upon existing designs with a custom controller. Now, feedback has led to a refined V2 version—a fully DIY build featuring a custom PCB and detailed documentation. This guide will walk you through constructing your own high-efficiency filament dryer using simple materials and electronics. By the end, you'll have a dryer that can actively warm and dry your filament, though we'll also address a common challenge—moisture removal—so you know how to optimize performance.
What You Need
Gather the following items before starting:
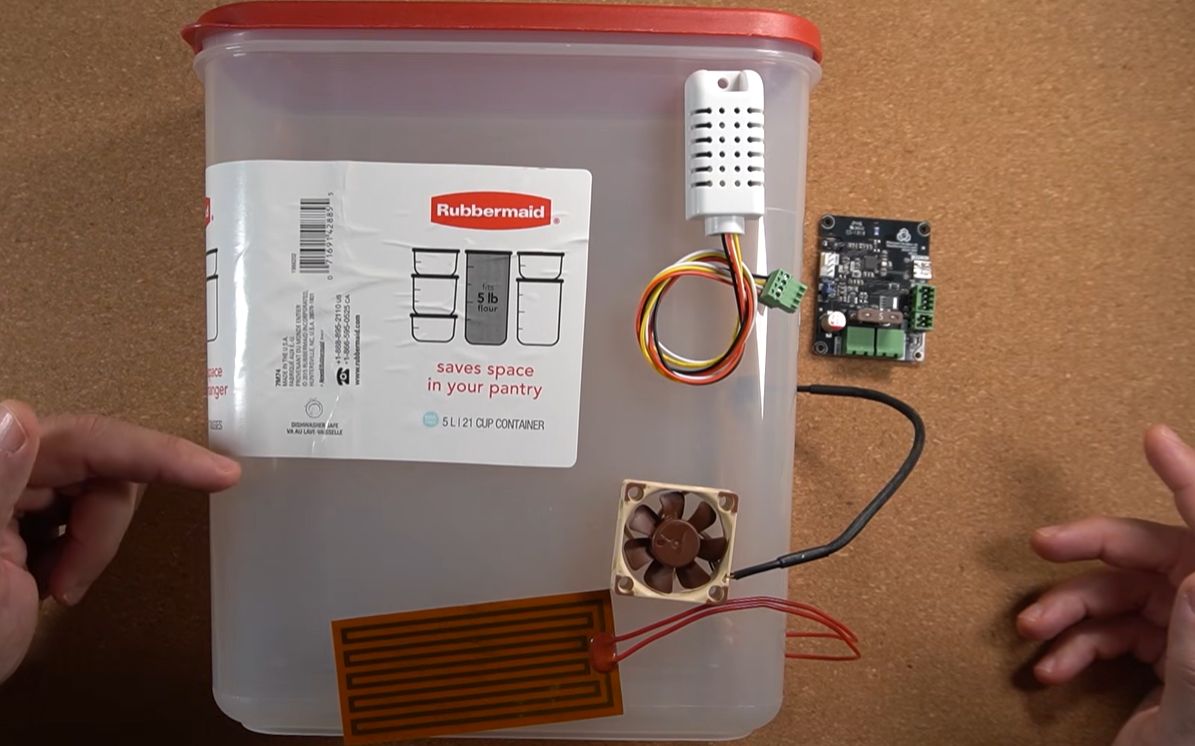
- Container: A 5-liter (or larger) food storage container with a lid (airtight, but we'll modify it later).
- Heating element: 12V polyimide resistive heater (flexible, low-power).
- Sensors:
- SHT30 temperature and humidity sensor (digital, I2C).
- 100K NTC thermistor (for additional temperature monitoring).
- Controller board: Custom PCB (designed for this project; you can order from the provided GitHub files) or a breadboard version with an Arduino/ESP32.
- Power supply: 12V DC adapter (at least 2A recommended).
- Wiring: Jumper wires, screw terminals, and heat shrink tubing.
- Tools: Soldering iron, multimeter, drill with hole saw, hot glue gun, screwdrivers.
- Software: Arduino IDE or PlatformIO for firmware upload.
Step-by-Step Guide
Step 1: Prepare the Container
Why: The container will house the filament and heat evenly. A modified food storage box keeps heat in while allowing some airflow.
- Drill two small holes (e.g., 5mm) in the lid for wiring pass-through—one for the heater, one for the sensors. Also drill a 20mm hole for a future ventilation port (we'll cover that in Step 6).
- Sand the edges smooth to avoid wire damage.
- Optionally, line the bottom with a heat-resistant mat (like silicone) to protect the plastic from direct heat.
Step 2: Assemble the Heater and Sensors
Why: The resistive heater provides warmth, while the SHT30 and NTC monitor conditions.
- Solder wires (22 AWG) to the polyimide heater terminals. Use heat shrink.
- For the SHT30: solder header pins or wires to its breakout board. Note the I2C address (usually 0x44).
- For the NTC: solder wires to the thermistor leads. Since it's a resistor, polarity doesn't matter.
- Test each sensor with a multimeter before installation.
Step 3: Mount the Electronics
Why: Secure placement prevents shorts and ensures accurate readings.
- Glue the SHT30 and NTC thermistor inside the container lid, preferably away from direct heater contact but close to where filament sits (e.g., on a small bracket).
- Mount the heater inside the container bottom. Use adhesive dots (3M VHB) to attach it securely—ensure it doesn't overlap edges.
- Pass wires through the lid holes. Seal the holes with hot glue to maintain some airtightness.
Step 4: Build the Controller Board
Why: The controller interprets sensor data and switches the heater. The custom PCB makes it tidy, but you can prototype.
- Order the PCB from Saša Karanović's GitHub project (link in documentation). Alternatively, use a perfboard with an Arduino Nano or ESP32.
- Solder components: the microcontroller, MOSFET (e.g., IRLZ44N) for heater control, voltage regulator, and connectors for sensors/power.
- Connect the heater to the MOSFET output (12V, up to 2A). Connect sensors: SHT30 via I2C (SDA, SCL, VCC, GND), NTC to analog input (with a 10K pull-up resistor to 3.3V).
- Power the board with 12V via barrel jack or screw terminal.
Step 5: Program the Controller
Why: Firmware reads sensors and regulates temperature (e.g., 60°C for PLA, 80°C for PETG).

- Download the firmware from the GitHub repository. Open in Arduino IDE.
- Set your board type (e.g., Arduino Nano). Adjust pin definitions if using a different setup.
- Upload the sketch. Test serial output—you should see temperature and humidity readings.
- Set target temperature and hysteresis as needed. The code will toggle the heater based on NTC feedback.
Step 6: Improve Airflow (Critical Fix)
Why: As Saša notes, warm saturated air must escape to allow cooler, drier air to absorb more moisture. Without this, drying stalls.
- Create a small ventilation port: drill a 10mm hole in the lid and fit a push-fit cable gland (or use a simple adjustable vent).
- Alternatively, prop the lid open by 2-3 mm with a spacer (like a rubber foot). This mimics the common recommendation for commercial dryers (e.g., Sunlu).
- Important: Don't seal the container completely. The controller will keep heat, but moisture needs a path out.
Step 7: Final Assembly and Test
Why: Confirm everything works before drying valuable filament.
- Place the heater inside the container, mount lid with sensors, and connect the controller box externally (keep electronics away from high humidity).
- Power on. Monitor temperature and humidity via serial or an OLED display (optional).
- Test with a sample of moist filament. Aim for 50-60°C for PLA, run 4-6 hours. Check weight loss.
- Adjust setpoint or ventilation opening if temperature fluctuates too much (overshoot/undershoot).
Tips and Tricks
- Ventilation is key: Always leave a small gap or vent. Even commercial dryers work better slightly ajar. Moisture transport relies on air exchange.
- Calibrate sensors: Compare your SHT30 and NTC against a trusted thermometer. Offset in software if needed.
- Safety: Use a fuse (e.g., 2A inline fuse) on the 12V power line. The polyimide heater can get hot; avoid touching container during use.
- Container choice: A 5L polypropylene food box works well. Avoid metal containers (conductive) or thin plastic that may warp.
- Customization: Add a fan for forced air movement? Saša didn't, but it could speed up drying. Just ensure the PCB firmware supports an output.
- Check the GitHub: Find the full BOM, PCB files, and firmware at Saša Karanović's project repository. It's all open source.
With these steps, you'll have a DIY filament dryer that's efficient, adjustable, and way cheaper than store-bought ones. Happy printing!
Related Articles
- Understanding the Cargo Tar Directory Permission Vulnerability: Q&A with the Rust Security Team
- Building Resilience Against Destructive Cyber Attacks: A 2026 Preparedness Guide
- Germany's Rise as Europe's Cyber Extortion Hotspot: Key Questions Answered
- Navigating the Modern Cybercrime Landscape: A Strategic Guide for Enterprise Defenders
- Frontier AI and the Evolution of Cyber Defense: A Q&A
- Defend Against Social Engineering: A Guide to Apple's Terminal Paste Protection
- ACSC Warns of ClickFix Campaign Spreading Vidar Stealer – What You Need to Know
- Python 3.14.2 and 3.13.11: Emergency Releases Address Regressions and Security Vulnerabilities